Introduction: The Journey to Building a Solar Farm
Since solar energies are critical in ensuring that the transition torenewable energy is smooth, innovations in the development of the solar energy industry are important for society. At the moment, the solar industry is rapidly blossoming and transforming sunlight into usable energy during the time the systems are constructed. That said, the building of solar systems requires a lot of planning, time, and resources.
Just like any fossil fuels dominant systems, whether it is a large scale solar power farm or community sponsored initiative, the project grows in leaps by brainstorming ideas to fully harness natural resources. The adjustment to these programs is quite promising but comes with its challenges too.
Building and developing potent solar energy sources requires complex workings and sufficing determination, and a powerful plan. A properly functioning clean energy system stemming from a single innovative idea while being responsive to environmental threats is worth close inspection.
What is a Solar Farm?
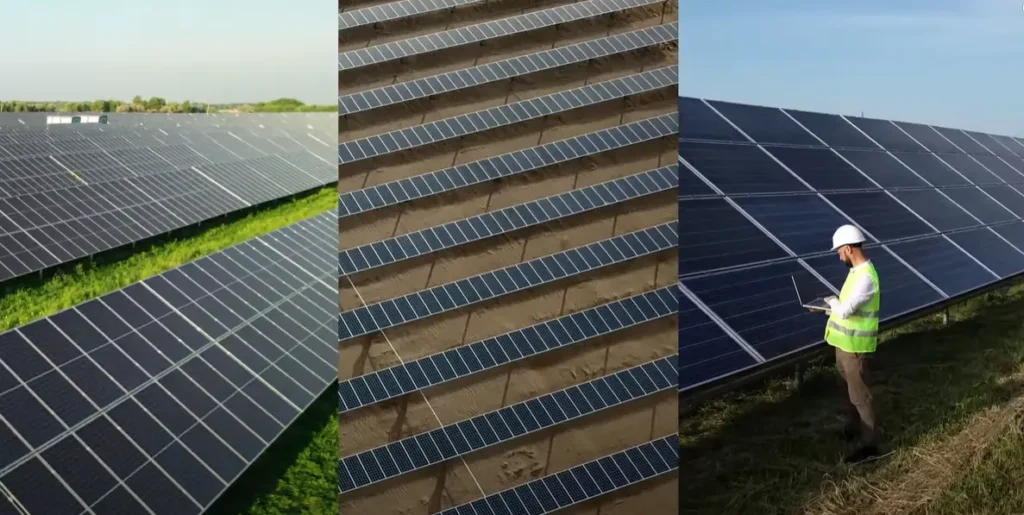
Prior to investigating the details surrounding its development, let’s start with the important question: What is a solar farm? Very simply, a solar farm, or solar power plant (sometimes referred to as solar parks or a photovoltaic power station), is one of the foremost implementations of solar photovoltaic (PV) systems that is intended to produce power generation for the electricity grid (or simply the grid). The difference between a solar farm and roof top solar installations is the latter only benefits a single building while the former aims to support a much larger network that include communities, businesses, and entire regions, often working with a utility company.
Think of a large agricultural field that instead of harvesting crops, harvests sunlight. The rows and rows of solar panels, sometimes thousands or millions, must be optimally positioned to achieve the best solar irradiance for maximum solar energy production. The photovoltaic (PV) panels are the workhorses of the farm that do the magic of converting sunlight into Direct Current (DC) electricity. Using the photovoltaic effect, the panels capture the photons from the sun. The output from the panels is in DC electricity which must pass through inverters to be converted into Alternating Current (AC) electricity. This is the form of electricity needed by various residential and industrial activities. Before being put into use, this AC power is often increased in voltage by transformers. The necessary wiring for both DC and AC systems is a critical component.
The scale can vary dramatically. A modest small solar farm may be only a few acres in size and supply power to a couple of hundred homes or be part of a community solar project with subscribers. On the other hand, utility-scale solar farms (solar projects) can reach over a thousand acres in size while producing hundreds or thousands of megawatts (MW) of power, sufficiently powering cities. Utility-scale solar farms are not simply a collection of solar panels; they are sophisticated power plants equipped with modern solar panels, advanced monitoring, control systems, and grid interconnection infrastructure. These solar farms represent a new model for generating energy, diverging from the centralized and heavily fossil fuel-dependent structures toward decentralized,cleanenergy generation systems, sometimes incorporating solar energy storage. Therefore, these solar farms are more than just units of hardware; they are sophisticated near real-time power plants with storage capabilities that facilitate the world’s shift toward the adoption of low-carbon systems. This exemplifies a direct investment in energy independence and responsibility for the environment, often driven by a dedicated solar company.
Phase 1: Laying the Foundation – Planning & Site Selection
Just like every architectural masterpiece has a well-laid foundation, a solar farm must undergo meticulous planning and strategic site selection to succeed. Similar to a vineyard, choosing the right soil significantly impacts the vineyard’s growth; the location greatly affects the project’s viability and performance.
Planning the project undergoes a thorough market analysis and sets achievement milestones such as end-user identification, planned power generation, and scheduling for estimation budgets. Grid access and feed-in tariffs also play a crucial role in making these decisions.
The following criteria have to be met for the right site selection:
- Solar irradiance: Solar resources contribute significantly to the energy efficiency of the system. Areas with a high value of Global Horizontal Irradiance (GHI) and Direct Normal Irradiance (DNI) are highly preferable. Tools specifically designed to measure these conditions are widely available.
- Land characteristics: Ample, moderately priced, and flat tracts of land to accommodate large scale installations are ideal. Also, lean lots tend to come with more favorable lease terms, and securing land rights can streamline project execution.
- Grid proximity: Locational connection to substations and transmission lines significantly reduces both expenses and technical difficulties associated with site connection.
- Soil and Ground conditions: Geotechnical studies prevent floods and shifting terrain by analyzing the soil’s capacity to support infrastructure and identifying other risks.
- Environmental impact: Developed or low-value farmland tends to have reduced surrounding ecosystems, water sources, and cultural sites which allows for less disruption. Environmental assessments also guarantee minimum disruption.
- Permits and Zoning: Preferably, the land should already be zoned for industrial and energy use or can be easily rezoned. Also, national and regional local permits should be navigated within the area.
- Access and Maintenance: The site needs to provide construction work and operations access during the entire life cycle of the project. Road proximity is extremely beneficial.
- Topography and Shading: Indeed, flat land is preferred, though slight slopes are workable. Tree or building obstructions need to be removed so that uninterrupted sunlight can reach the site.
Probably several potential sites will be analyzed in an attempt to determine the most appropriate. This combines technology, ecology, strategy, and this is the initial step for every solar farm.
Phase 2: Securing Resources – Financing & Permitting
With a site selected and plans taking shape, the project moves into a complex and often demanding phase: preparing for construction by meeting legal, technical, and administrative requirements. This includes acquiring necessary approvals and ensuring that all foundational elements are in place for the project to move forward smoothly.
Preparing for Implementation
Solar farms require significant resources—technical planning, equipment, construction materials, and operational readiness. Before any physical work begins, the project team must ensure that all aspects of the design, feasibility, and long-term operation are well-documented and aligned with expectations. Agreements with electricity buyers, schedules for delivery, and detailed project models are typically refined at this stage to improve readiness.
Many solar projects benefit from supportive policies, such as tax incentives, long-term energy agreements, or community-driven initiatives that can enhance their viability. Clear communication of the project’s value—such as environmental benefits, local energy supply, and potential job creation—can help reinforce its importance.
Navigating Permits
Permitting is a critical and detailed process, often involving multiple layers of government and regulatory bodies. Key permits may include:
- Land Use & Zoning Approvals: Ensuring the site meets local planning requirements.
- Environmental Assessments: Addressing impacts on wildlife, water, and nearby natural or cultural sites.
- Construction Permits: Covering structures, foundations, and related infrastructure.
- Grid Interconnection Approvals: Often one of the more technical steps, this involves confirming safe and stable integration with the power grid.
- Electrical and Safety Permits: Reviewing the design and installation of power systems.
- Aviation Clearance: Required if the site is near airports, to assess potential glare or height issues.
Public engagement is often part of this phase. Listening to local concerns, providing transparent information, and showing the broader benefits of the project can ease the path toward approval. Because delays at this stage can affect overall timelines, attention to detail and collaboration with experienced consultants are crucial.
Completing this phase successfully allows the project to move forward into physical development, bringing the solar vision closer to reality.
Phase 3: Designing the Blueprint – Engineering the System
As financing approaches completion and permits are within reach, the solar farm project moves into intricate engineering and design work. As the name suggests, detailed engineering and design involves creating the detailed technical plan to guide construction and installation, particularly the complex wiring of the system. This also ensures optimal performance of the structure once completed. It is like an architect preparing the work for a complicated building. He would have to note every single material for every connection, including every system with detailed schematics.
A designer is usually modeling an arrangement of many different types of engineers, like electrical, civil, structural and environmental. In detailed engineering and design the engineering team is expected to accomplish some very important tasks.
System Configuration and Layout:
| Category | Component | Description |
| PV System Design | Selection of PV Module | Choosing between monocrystalline, polycrystalline, and thin-film modules based on efficiency, cost, temperature, irradiance, and warranty considerations. |
| Inverter Selection | Deciding between central inverters, string inverters, or microinverters, affecting system design, energy yield, and maintenance strategy. | |
| Mounting System | Includes fixed-tilt or tracking systems (single/dual-axis). Trackers increase energy capture but are more costly and complex. | |
| Array Layout | Software-based modeling for optimal land use, minimizing shading and maximizing energy yield. | |
| Electrical Design | DC Collection System | Design includes wiring, combiner boxes, fuses, and disconnects to safely collect DC power from the panels. |
| Substation Design | Includes transformers, circuit breakers, and protection relays to step up voltage for grid transmission. | |
| Grounding & Lightning Protection | Robust grounding systems and surge protection devices (SPDs) to protect equipment from faults and lightning. | |
| Civil & Structural Design | Site Grading & Drainage | Site preparation through earthworks, ensuring proper drainage and erosion control. |
| Foundation Design | Design of foundations for mounting structures and key equipment, based on geotechnical survey results. | |
| Access Roads & Fencing | Construction of internal roads for access and maintenance, along with perimeter fencing for security. |
Monitoring and Control Systems (SCADA):
- Developing the Supervisory Control and Data Acquisition (SCADA) system enables remote monitoring of a solar farm’s operational parameters (energy output, equipment status), remote control of critical components, and logging of information for future analysis and reporting.
EnergyYield Assessment:
- Performing advanced energy production forecasting with specialized software (PVSyst, Helioscope) that accounts for site-specific weather conditions, panel specifications, inverter ratings, system losses such as shading, soil, temperature, wiring, and estimate long-term energy production of the farm. This evaluation is very important for financial forecasts and performance guarantees of the solar power plant.
Compliance and Standards:
- Proving that the complete design conforms with all applicable country and international electrical codes, safety standards, and grid interconnection stipulations.
In this engineering phase, a complete set of documents including the final detailed drawings, specifications, bills of materials and construction plans is compiled. It integrates the logic of the solar technology and the electrical engineering design with the site conditions. The engineering excellence in design directly influences the solar farm’s operational reliability, performance, and profitability over the lifetime of the farm.
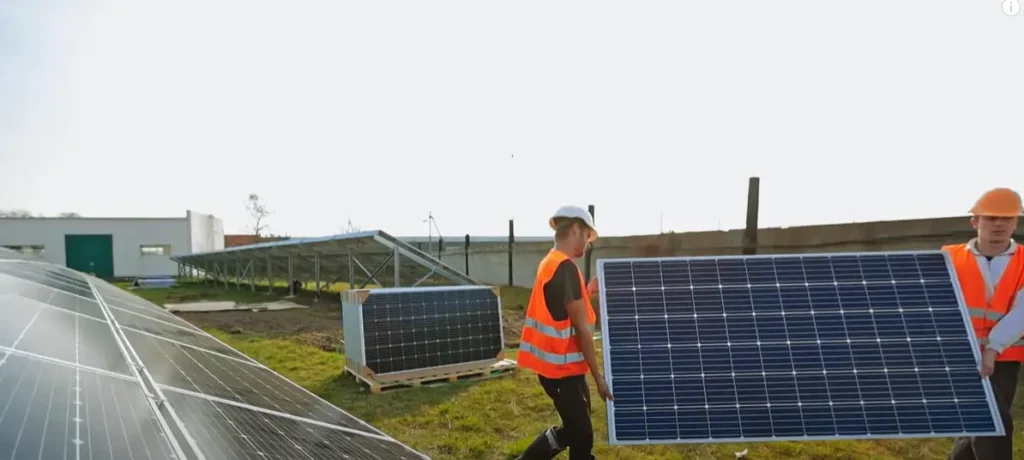
Phase 4: Bringing it to Life – Construction and Installation
Now that everything has been arranged, we can finally put our plan into construction where the overarching structure comes alive via parks of keen component selection, on-site execution, and meticulous engineering.
System Design & Components Selection
- PV Modules: Monocrystalline, Polycrystalline, and Thin-film solar panels all come with their very own perks considering the benefits and costs. Therefore, choosing the most suitable solar panels depends on cost consideration as well as site temperature, cost, and irradiance.
- Inverters: The inverter form significantly alters system arrangement, maintenance, and energy delivery whether it be centrals, strings, or microinverters.
- Mounting Structures: Single or dual-axes provide higher yields while stationary systems incur lower costs and less complexity. However, trackers are designed prescriptively fore site latitude and better optimised energy yield.
- Array Layout: Software simulates shading and spacing of the panels to supplant energetic yield while properly organizing land usage.
Electrical Design
- DC Collection: Allocating the fuses and designing the wiring and xombiner boxes maintain the power flow reliability created from panel to ground.
- Substation: Mounted substations with transformers, relays, and breakers perform the grid voltage elevation.
- Grounding & Protection: Surge essential and non-faulty grounding systems lower the odds of surging and lighting impacts.
Civil & Structural Works
- Site Grading & Drainage: Organising land and sculpting it to avoid water buildup while also preventing erosion.
- Foundations: All major designs are constructed with geotechnical findings as primary boundaries and ascertain equipment stability.
- Access & Security: Building internal maintenance roads as well as erecting safety fencing and restricting access.
This phase takes the project design and implements it into an operational solar facility that is prepared for commissioning and grid integration.
Constructing smaller projects (like a small solar farm) can take a few months, whereas larger utility-scale projects (solar projects, forming a large solar power plant) may run over a year. Specialized personnel, advanced machinery, and detailed project oversight are essential to synchronizing a myriad of activities to deliver on schedule and budget. A striking indicator of advancing towards a clean energy future is the sight of rows upon rows of gleaming solar panels gradually blanketing the landscape across many acres.
Phase 5: Connecting to the Grid – Integration & Commissioning
Constructing a solar farm is a significant milestone, but it doesn’t truly become a power-generating facility until it’s safely and efficiently connected to the electrical grid and fully operational. This stage bridges the gap between a newly built asset and its ultimate purpose—delivering clean power to consumers. It’s like having an engine ready, waiting to be started and contributing power to the wider grid system.
Grid Integration
| Component | Description |
| Grid Integration Objective | To electrically connect the solar farm to the utility transmission or distribution system, overcoming technical and regulatory challenges at utility scale. |
| Interconnection Agreement | A legally binding document that formalizes previously agreed parameters (from the PPA or similar). It includes protective requirements and defines the balance of responsibility between the solar farm operator and the utility. |
| Substation and Transmission/Distribution Line Construction | Involves linking the solar farm substation to the nearest suitable grid connection point, which may require building additional lines and complex wiring—sometimes as a separate project. |
| Interfacing Substation | Ensures proper integration of substation components (e.g., transformers, switchgear, relays) with the utility grid. Synchronization of all subsystems is critical. |
| Protection and Control Coordination | Advanced protection systems detect grid or plant faults and disconnect the solar farm when necessary. Control systems must coordinate with the utility, potentially providing services such as voltage and frequency regulation depending on grid codes. |
Commissioning Activities
a. Pre-Commissioning (Cold Commissioning)
| Checklist Item | Description |
| Site Walk-Through | Inspect all equipment for physical damage and verify installation matches the design and checklist. |
| Assembly Check | Ensure all parts are assembled in the correct sequence and properly fastened. |
| Electrical Testing | Check for continuity, polarity, shorts/opens, and insulation resistance. |
| Component Testing | Test individual devices like circuit breakers, disconnect switches, and relays for proper function. |
b. Hot Commissioning (System Energization & Testing)
| Testing Item | Description |
| Initial Energization | Gradual energization from the grid connection point toward the solar array side. |
| Inverter Testing | Confirm each inverter correctly converts DC to AC and synchronizes with the grid. |
| Array Performance Testing | Evaluate performance of solar panel strings (e.g., open-circuit voltage, short-circuit current). |
| SCADA System Testing | Verify control systems capture data, display information, and execute commands accurately. |
| Protection System Testing | Simulate faults and test protective equipment (relays, breakers) for correct response. |
| Grid Compliance Testing | Perform tests required by the utility to demonstrate compliance with interconnection standards (e.g., power quality, fault ride-through). |
Performance Verification
Once the full system is in place and energized, actual energy output is compared against predicted output based on solar resource forecasts. This post-commissioning analysis confirms that the solar farm performs to expectations and validates energy yield estimates.
Documentation & Handover
All operational manuals, as-built drawings, test records, and commissioning reports are formally handed over to the project owner and the operations and maintenance (O&M) team. Successful commissioning officially marks the beginning of the plant’s commercial operation, ensuring quality and reliability for decades. It is a major milestone both for the stakeholders involved and the renewable energy sector at large.
Protecting Your Investment: The Critical Role of SPD
*Example: Surge Protection Devices for Agriculture Applications – reduces agricultural losses, supercharges profits
Constructing a solar farm is a significant financial investment, often costing millions of dollars, with the expectation that it will operate efficiently for 25 years or more. However, such large-scale outdoor facilities are exposed to the highly destructive and unpredictable effects of lightning strikes. In addition to direct strikes, lightning can induce surges in nearby electrical infrastructure, including the grid or internal switching systems.
Solar panels, inverters, and control systems are among the most sensitive components of a photovoltaic installation. Lightning-induced surges—whether from direct hits or nearby discharges—can, can cause severe overvoltages, leading to damage or destruction of critical equipment. To mitigate such risks, installing a surge protection device for solar panel systems is strongly recommended. This results in costly repairs, equipment replacement, system downtime, and loss of revenue, all of which impact the owner’s return on investment.
Surge Protective Devices (SPDs) play a critical, often underappreciated role in mitigating these risks. SPDs are passive devices that instantly respond to transient overvoltages by diverting excess energy safely to the ground, thereby protecting downstream equipment. Within a solar PV system, SPDs are strategically installed at various points—including both AC and DC sides—to safeguard the complex electrical network.
| Section | Protected Equipment | Installation / Description |
| DC Side | Output of solar panels and DC input of inverters | SPDs are installed above the combiner boxes, on the panel side |
| AC Side | Inverters and downstream equipment from grid surges | SPDs are installed at the output of inverters and on the main AC distribution panel |
| Data & Communication | SCADA systems and communication networks | SPDs are required to protect control systems from damaging surges over data/communication lines |
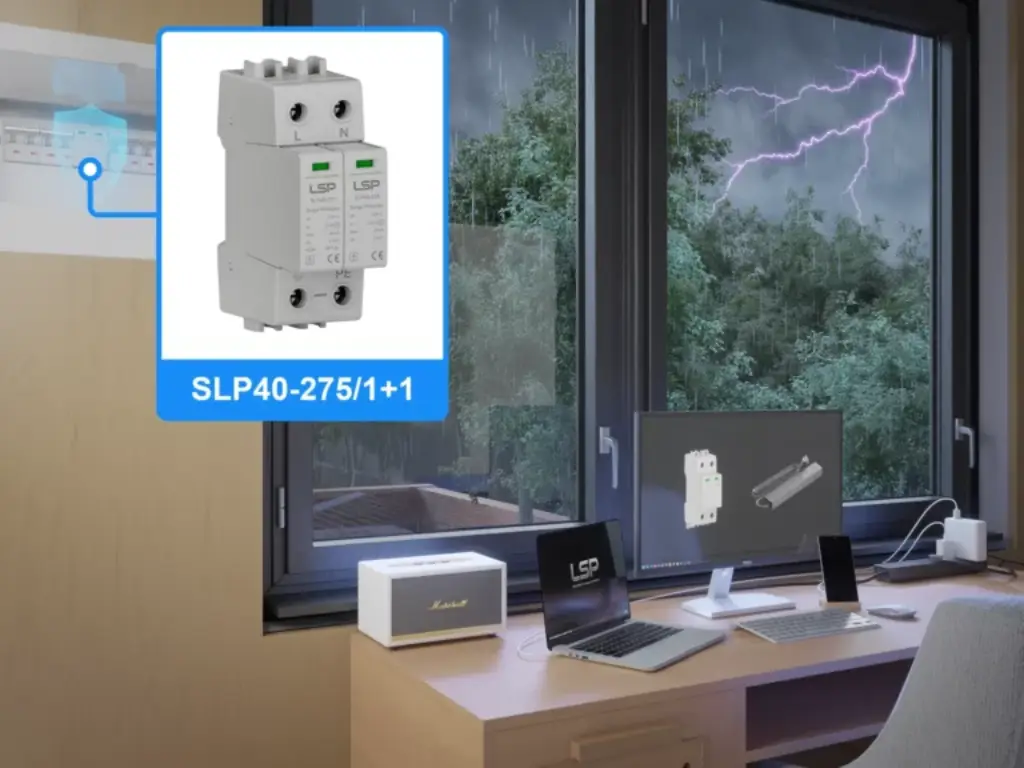
SPDs must be selected and installed with due regard. These include the site’s lightning exposure level as defined by the local lightning flash density zone, system voltage, short-circuit current rating, and the specific protection needs of the equipment. Use IEC 61643-32 (for SPDs on the DC side of PV installations) and IEC 61643-11 (for SPDs on low-voltage AC systems) for proper selection and application.
Failing to properly assess the need for effective surge protection can lead to misallocated funds and costly downtime. While the investment in a complete SPD system is modest, the financial consequences of a single major surge can be severe. High-quality SPDs, built with robust materials, help ensure long-term system reliability and performance, protecting both the investment and stakeholders in the solar power chain. For more insights on how do solar farms work safely, explore essential surge protection methods.
Why Choose LSP’s SPD Solutions for Your Solar Farm
At LSP, we know that building a solar farm is a major investment meant to last decades—and we’re here to protect it. Since 2010, we’ve focused exclusively on the R&D and manufacturing of surge protective devices (SPDs), delivering reliable protection against lightning-induced surges that can damage inverters, panels, and control systems. Our SPDs are built with premium components—such as LKD MOVs and Vactech GDTs—used by top global brands. With robust performance (In=20kA, Imax=40kA), long-term stability, and a 5-year warranty, we offer durable solutions that support uninterrupted solar power generation.
We don’t believe in one-size-fits-all protection. That’s why our SPDs feature a modular design that supports both 3+1 and 4+0 configurations, meeting the diverse needs of different grid systems in Europe and China. We also offer optional components like extra GDTs for enhanced protection of sensitive equipment. Our internal disconnection device, developed over three years, effectively isolates and extinguishes arcs to prevent fire risk. Moisture-resistant encapsulation and low-temperature tripping technology further ensure safe operation in harsh outdoor environments.
Beyond product design, we back our solutions with strong production and quality systems. With an annual capacity of 300,000 units and ISO9001, TUV, CE, and CB certifications, we ensure every SPD undergoes rigorous testing—from 8/20 and 10/350 waveformtrials to salt spray and flame-resistance tests. Whether for standard or customized products, we deliver fast (10–15 days) and provide full support—from 3D design modeling to remote diagnostics and spare parts service. Choosing LSP means choosing protection you can trust—for your equipment, your investment, and your peace of mind.