Your Solar System: More Than Power, It’s a 25-Year Financial Asset
Investing in a solar photovoltaic (PV) system is a big decision. It is an energy self-sufficiency statement, an environmental responsibility promise, and, above all, a major financial project. The debate on solar energy is usually reduced to kilowatts and carbon footprints. These are important measurements, but they conceal a more fundamental fact: you are not merely buying a utility appliance, you are buying a personal power generation system, an investment that is likely to pay off in a quarter of a century or more.
It is a 25 year investment and it must be treated as such. The design of the solar power system is the most important. Like any other important financial asset, its worth is not just in its potential at the outset but in its resilience and its ability to withstand both predictable and unpredictable risks over its lifetime. A system that produces enough power on day one is not a good investment when it is likely to fail on day one hundred, or day one thousand.
Your solar PV system is not strong by chance, but a direct result of intelligent, prudent design of your photovoltaic system. An adequately engineered pv system is a robust one, not just one that generates a lot of energy in an efficient manner, but one that actively protects itself against the same forces that can destroy its parts and make your investment a waste. This article will be your guide to the design of a solar system. We will not just do the simple power calculations, but develop a full solar system design philosophy that will not only make your solar asset productive, but also durable, robust and actually long-lasting.
Step 1: Start with Your Energy DNA – A Thorough Load Analysis

The process of pv system designmust begin with the simplest and most objective piece of information you possess when you purchase a single panel or run a single wire: your real energy consumption. Building a power plant without a clear understanding of the demand that it will be utilized to provide is a very expensive game of guesswork. The initial phase of these system designs is related to the creation of a detailed energy consumption portrait, a specific portrait of your consumption patterns that will inform all further choices.
Your primary source document is your utility bill. In doing so, do not disclose any sensitive information that is not necessary when going through it. Calculate your energy consumption, in kilowatt-hours (kWh), by going beyond the total amount due. Take at least 12 months of bills consecutively to take into account seasonal variations. The energy used by a household in the hot summer months when air conditioning is on can be radically different than the energy used by the household in the cool spring months. Divide your monthly kWh consumption by the days and identify your peak month. This is a critical number to your design.
Then we move from the macro to the micro. Make a list of appliance loads, a list of all the large electrical appliances in your home or business. You must locate two significant numbers for each item:
- Rated Power (Watts): This is the power that the appliance uses when it is operating. It is usually on a sticker or nameplate on the device.
- Hours of Use: An honest estimate of the hours per day that the appliance is used.
The number of watt-hours of energy consumed by that device per day is the product of the rated power and the number of hours used. All these combined with all your appliances will give you a bottom-up estimate of your daily energy need. This test not only verifies what your utility bill says, but also indicates your peak power demand, the maximum wattage your system can be called upon to deliver at any given moment should a combination of several large appliances be running simultaneously.
Finally, a robust design accounts for the future. Would you purchase an electric vehicle (EV) in five years? It is easy to add 7-10 kWh or more to your daily load with a charger. Are you planning a new electric hot tub or a workshop addition? Factor in a buffer for future growth, typically between 15% and 25% of your current load. This vision does not entail the costly problem of a small solar system a few years down the line.
Step 2: Sizing the “Big Three” – The Heart of Your Power Plant
*This video explains SPV design through numerical methods for reference.
With a clear picture of your energy requirements, we are now in a position to proceed to the technical core of the pv system, which is the sizing of the primary generation, conversion and storage units. These three elements—the solar panel array, the inverter, and the battery bank—are the core components of your power generation system. The performance and life of your investment cannot be compromised on their proper sizing and selection.
Calculating Your Solar Panel Array
Your system is centered on the array of solar panels that convert sunlight into electricity. The total power of your array in kilowatts (kW) is determined by a very simple but significant formula that correlates your energy needs with the quantity of solar energy at your specific location. One of the most important aspects of what is pv design is to properly calculate this size in order to maximize your energy production.
The Peak Sun Hours (PSH) is the most significant variable in this instance. This measure is the number of hours in which the sun is bright enough to generate 1,000 watts per square meter. A location having 5 PSH does not necessarily get five hours of daylight; it gets the same amount of solar energy as five hours of sunshine at its peak.
This is calculated as follows: Array Size (kW) = (Average Daily Energy Demand in kWh) / (Peak Sun Hours)
System inefficiencies are also something to consider. Conversion of DC to AC, wiring and other factors such as soiling of the pv panels all result in energy loss. The average efficiency factor is 0.77-0.85.
So, the refined formula becomes: Array Size (kW) = (Average Daily Energy Demand in kWh) / (Peak Sun Hours * System Efficiency Factor)
When selecting a pv module, you will largely be deciding between monocrystalline and polycrystalline technologies. These modules consist of numerous single solar cells. Monocrystalline panels tend to be more efficient and effective in low light, but are more costly. Poly crystalline panels are less expensive but slightly less efficient. Record the specification sheet of the panel, including its rated power (e.g., 400W), efficiency percentage, and voltage characteristics (Vmp and Voc), which are significant to align with your inverter.
Selecting the Right Inverter for the Job
The most important control unit of your solar photovoltaic system is the inverter. It converts the direct current (DC) electricity produced by your solar panels into the alternating current (AC) that powers your home and the electrical grid. The best thing is to select the right type and size.
There are three types of inverters:
| Type | Features |
| Grid-Tied Inverters | Most common and simplest; connected to the utility grid; automatically shut down when the grid is down; not suitable for battery storage. |
| Off-Grid Inverters | Designed for standalone systems; require a battery bank to operate; cannot feed excess power back to the grid. |
| Hybrid Inverters | Combine the advantages of grid-tied and off-grid; can run on solar or grid power; provide backup power during outages with batteries; often used in robust, investment-grade systems. |
The inverter rated power should be close to the sum of the power of your solar array. The most common rule of thumb is to set the inverter capacity to 75 to 125 percent of the DC rating of the array. String inverters and microinverters will also be available to you. A single string inverter regulates the power of a complete “string” of panels, which is cost-effective but vulnerable to shading- when one panel is in the shade, the performance of the whole string can be affected. Microinverters are mini inverters which are attached to every pv module. They cost more but maximize the output of each panel individually, and are therefore most appropriate to roofs with complex angles or intermittent shading issues.
Sizing Your Battery Bank (For Off-Grid & Hybrid)
The final piece of the core hardware puzzle for individuals who desire to be energy secure is a battery bank. It stores excess energy generated during the day to be utilized at night or during power outages. Battery size depends on your critical loads and your desired Days of Autonomy, how many days in a row you would like your system to be able to operate without any solar power.
The capacity of a battery is measured in Amp-hours (Ah) or more easily in kilowatt-hours (kWh). The basic calculation is: Battery Capacity (kWh) = (Daily kWh for Critical Loads * Days of Autonomy) / (Battery Depth of Discharge)
Depth of Discharge (DoD) is a highly significant concept. It is the ratio of the overall capacity of the battery that can be used safely without harming the battery. The DoD can be about 50 in the case of traditional lead-acid batteries. With modern lithium-ion batteries (e.g. LiFePO4), it can be 80-100%. This by itself has a massive impact on the usable capacity of your bank; a 10 kWh lithium battery with 90% DoD has nearly twice the usable energy of a 10 kWh lead-acid battery with 50% DO. Lithium batteries are more expensive at the start, but last longer, are more efficient, and have a higher capacity, making them the option in a long-term asset.
Step 3: Blueprinting Your System – Site, Shading, and Structure
The design process is now transferred to the physical world where the core components are sized. Where you place your solar array and how you install it is as significant to performance as the hardware. A poorly placed array is a poorly performing asset, regardless of how good its panels and inverters are.
The site analysis begins with the roof or ground area where the installation will be carried out. The key factors are:
| Factor | Description |
| Area | Ensure there is enough physical space to accommodate the required number of panels for your target array size. |
| Orientation (Azimuth) | In the Northern Hemisphere, optimum annual production is achieved with a true south-facing orientation. East- or west-facing roofs can be used but will generate about 15–20% less energy. |
| Tilt Angle | The ideal tilt angle is usually close to the site’s latitude, maximizing sun exposure throughout the year. Most residential systems follow the roof’s existing pitch, which is generally sufficient. |
Shading analysis is a necessity. A single shade created by a tree, chimney, or a nearby building can have a disproportionate impact on a row of solar panels. The analysis should be carried out at various times of the day and year to take into account the varying direction of the sun. An accurate map of the shading patterns can be created with a Solar Pathfinder or special software to ensure that the design can place panels in the most productive locations.
Finally, the integrity of the installation structure must be provided. The structural system that attaches your array to the roof is the racking system. It must be built to survive the worst of the local weather, including the highest wind speed and snow loads. The racking must be made of robust and non-corrosive materials like aluminum and stainless steel. The roof structure itself should be considered to ensure that it can support the extra weight of the array and racking. A professional installer will check this and all roof penetrations to be mounted will be sealed and flashed to prevent leakage decades later.
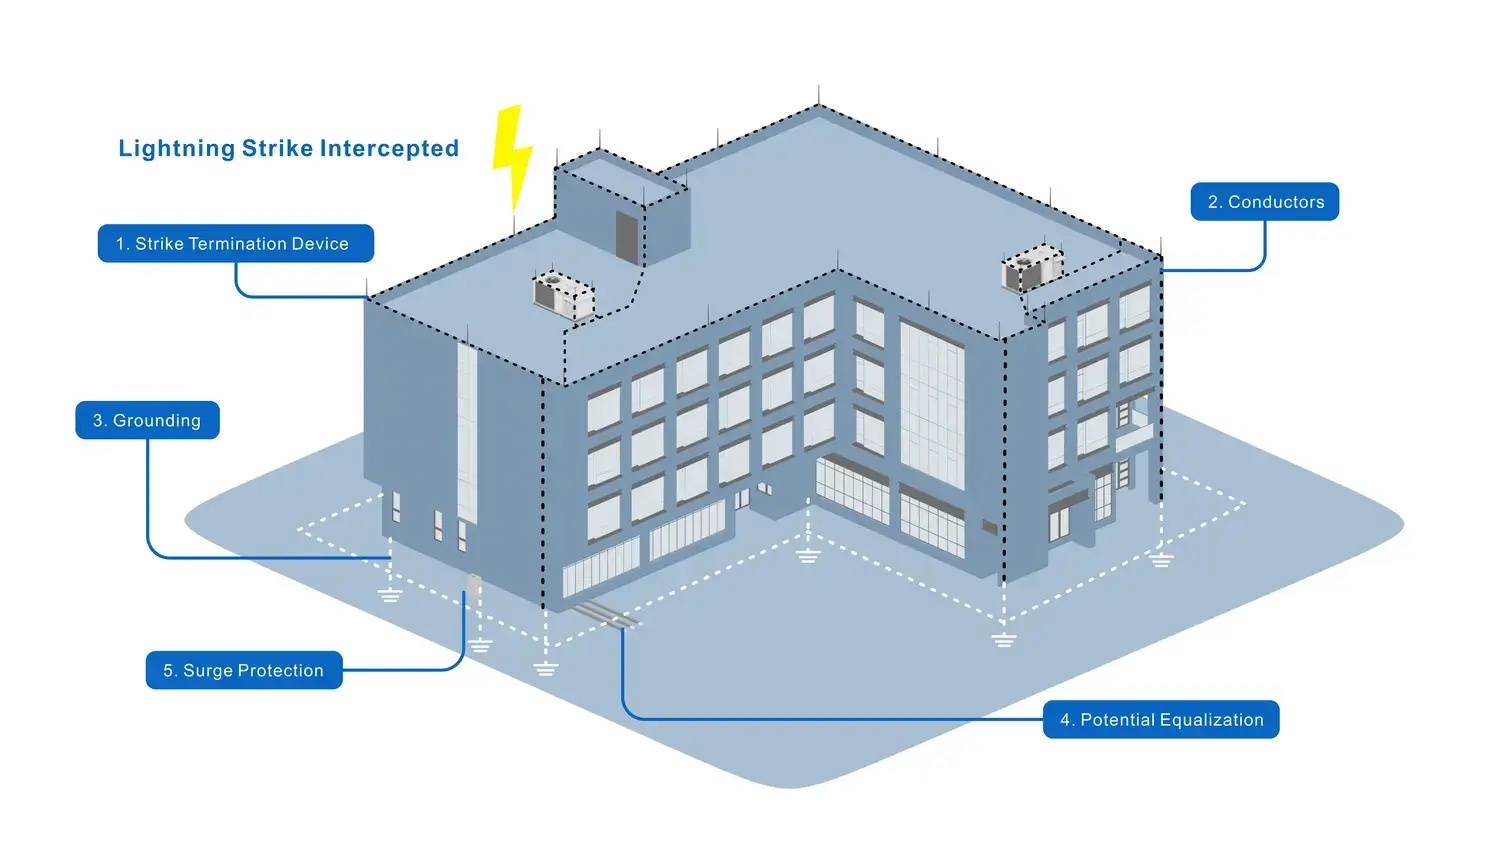
The Missing Link: Fortifying Your Investment Against Invisible Killers
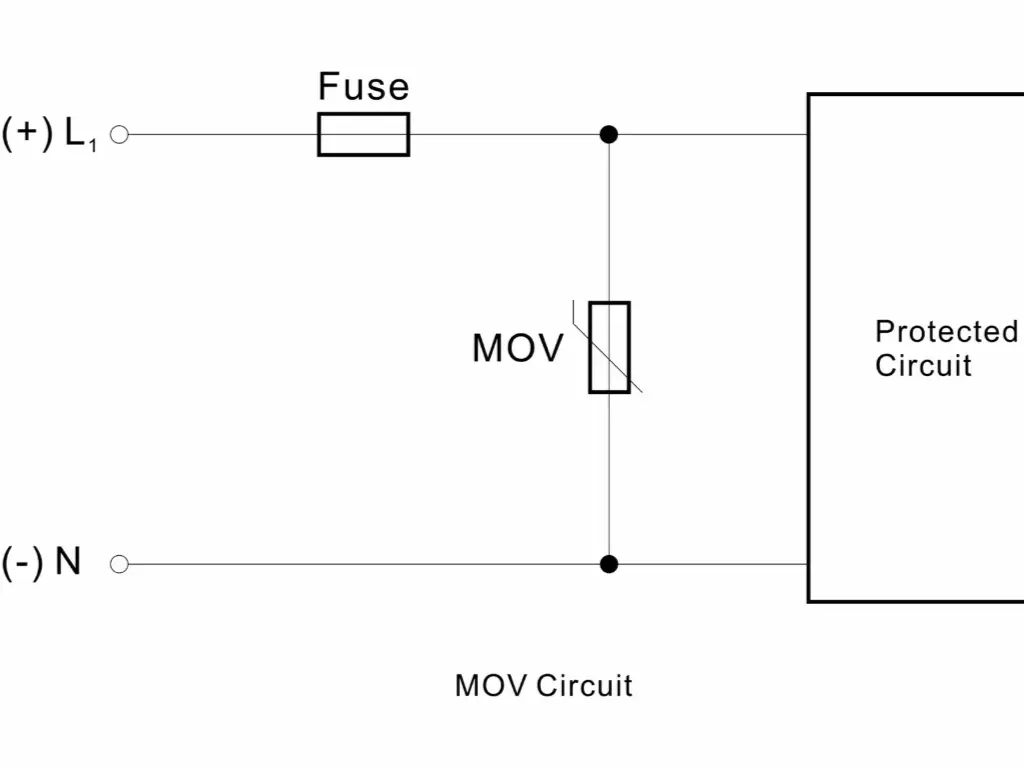
When you invest heavily in a photovoltaic system, one often overlooked but deadly threat is the surge. These sudden overvoltages come from lightning strikes, grid fluctuations, or the switching of large equipment. In solar installations, vast metal panel arrays act like giant antennas, making them especially vulnerable to these invisible killers. Without proper protection, the system is constantly exposed to risks you cannot see.
Once a surge strikes, inverters, controllers, and even battery BMS units can suffer a “one-shot fatality.” Such damages are rarely covered by standard warranties, leaving owners with significant replacement costs and threatening the return on their huge investment. For businesses and homeowners alike, every unexpected downtime or component failure directly erodes long-term performance and profitability.
That is why Surge Protective Devices (SPDs) are not optional. They are essential. Since 2010, LSP has specialized in SPD research and manufacturing, delivering products certified to international standards (IEC/EN 61643, TUV, CB, CE). Unlike generic solutions, our SPDs stand out with proven advantages:
- Stronger protection: Built with LKD MOVs and Vactech GDTs—recognized by global industry leaders—capable of withstanding repeated 20kA surges with stable performance and over 5 years of service life.
- Enhanced safety: A uniquely engineered internal disconnection device with low-temperature tripping isolates arcs completely, preventing fire hazards.
- Tailored solutions: Modular designs compatible with both 3+1 and 4+0 configurations, serving European and Chinese markets alike, with customization and professional selection guidance available for your specific PV system.
Step 4: Connecting It All – The Balance of System (BOS)
Even though most focus is on the Big Three, the factors that hold them together, the Balance of System (BOS), is also critical to safety and efficiency. These are just but a few areas that cannot be compromised because they can lead to low performance and severe safety hazards.
- Cabling: PV system wires must be solar-rated (PV Wire). They are designed to withstand high UV and high temperatures. The thickness (gauge) of the wire matters; it must be large enough to conduct the maximum current of the circuit with the least voltage drop, which is a direct loss of power.
- Breakers and Fuses: These are your primary safety equipment, which is utilized to protect your equipment and prevent fire by breaking the circuit in the event of an overcurrent or short circuit. DC-rated breakers and fuses should feed the DC parts of the system and should be located conveniently as required by electrical codes.
- Charge Controllers (battery-powered systems): This is a device that regulates the voltage and current passing out of the solar panels to make sure that your batteries are not overcharged. Two are Pulse Width Modulation (PWM) and Maximum Power Point Tracking (MPPT). MPPT controllers are more sophisticated and efficient and can use the additional voltage to generate additional current that can generate up to 30 percent more power during colder weather. An MPPT charge controller is the only sensible choice in the case of an investment-grade system.
Step 5: Navigating Permits, Regulations, and Financials

A technically sound design is half the battle. You must navigate through a minefield of administrative and financial hurdles to bring your solar system to life. Ignoring this step can lead to costly delays, failed inspections, or the loss of valuable incentives.
First, you must be conversant and adhere to all the local building and electrical codes, such as the National Electrical Code (NEC) in the United States. These regulations do not only regulate proper wiring methods and grounding, but also the position of safety disconnects. It is strongly advisable and in most instances compulsory to have your system designs checked and the installation performed by a licensed professional. This offers safety and compliance.
You will need to complete a grid interconnection application when you are connecting your pv system to the utility grid. This is achieved by submitting your system design to the utility company to be accepted. They will make sure that your system meets their safety and equipment standards before they will permit you to operate. Finally, consider the total cost of ownership and financial incentives. The total cost is not only hardware but shipping, installation labor, permitting fees, and potential inspection costs.
Your Payoff: A Resilient, Profitable, and Well-Protected System
In the design of a photovoltaic system, surge protection is not an optional add-on but a core safeguard throughout its 25-year lifecycle. Since 2010, LSP has specialized in the R&D and manufacturing of surge protective devices (SPDs). With premium raw materials, rigorous quality control, and globally recognized certifications, we ensure that every system not only delivers excellent power generation but also operates with long-term stability and safety.
Integrating professional SPD solutions at the very beginning of your project establishes a solid defense line for your investment. LSP’s MOVs and GDTsare sourced from top-tier global brands and have passed multiple high-current impulse and durability tests. Combined with our internally developed disconnection device, moisture-proof encapsulation, and low-temperature tripping technology, your PV system remains reliable even under severe lightning strikes and electrical surges.
The key to long-term profitability is not only generation efficiency but also consistent system reliability. LSP supports your investment with a 5-year extended warranty, rapid-response after-sales service, and customizable SPD solutions. This ensures your project achieves higher returns and worry-free operation for decades to come. Contact our experts today for a free surge protection configuration plan for your PV system, or explore our SPD product series designed specifically for photovoltaic applications.